Blog

Bending a penguin

Awhile back I did a quick vector illustration of a penguin. It was nothing much really but as far as penguins go I quite liked this one. Recently (as in, the last four months) I’ve been interested in databending. Have you ever had an image you’ve taken come out like it’s been through a shredder? That’s the effect that most databenders are after. In a way it’s like trying to reproduce an error. Once you’ve done it a few times you get to learn what effects different methods can produce but even then it’s very unpredictable. For a short tutorial on databending an image, take a look at the one I wrote for fizzPOP.

Penguin

My curiosity lead me to see what can be done to databend an SVG file. In a similar way to a jpg or gif they’re just data but the difference is it’s human-readable. That is, someone could look at how an SVG is created and understand it. For example this code:

<!--?xml version="1.0" encoding="UTF-8" standalone="no"?--> <!-- Created with Inkscape (http://www.inkscape.org/) -->

..Produces this circle:

Vector Circle

With a bit of time you could easily read and write that code yourself.

So, with that in mind, using similar methods to this databending tutorial, can we apply a similar effect to the penguin? Like jpg’s etc the SVG has a header that, if modified, completely destroys the file. Using the above example the header is from lines 01 to 10. Open up your SVG in a text editor (for Windows I recommend Notepadd++, for Ubuntu/Linux Scite), cut those lines (a simple Ctrl+X will do) and then begin to edit your document!

You’ll notice that you have little flexibility with how you can modify it. With a jpg you can replace or delete any character and replace it with (almost) any other one. In an SVG if you change any of the letters then you render it useless. For example, fill is a function that defines the colour of a shape. If you changed each instance of fill to say fail it would just simply break the file. Epic Fail. What you want to do is replace numbers with other numbers. There is a danger that replacing #090909 with #0909999909 could break the colour values but so far I have encountered no problems.

Once you have replaced a few numbers paste back in the header and then save it again. Open it back up and take a look at the results! Below are a few modifications I made. The process is described in the link.

Penguin - Delete 8 Penguin - Replace 8 with 15 Penguin - Replace 8 with 1

You may find that each shape has become very warped or that the dimensions of your document have increased tenfold! That’s the beauty of the randomness that is databending.


Blending Inkscape and Blender

One of the things I’ve always wanted to do is to work on an image in a 3D environment but then export the resultant image to an svg. Being the open source nut that I am my main weapons of choice are Blender for 3D work and Inkscape for vector. These programs have their advantages and their disadvantages. The main advantage they have over many similar programs is that they’re open source and free. They’re very capable products and are used quite widely and are being actively developed. In fact, Inkscape is getting ready to release version 0.47 (I’ve used a prerelease and it’s awesome)

For my task of exporting 3D models to SVG Blender falls slightly short because it doesn’t natively support this. There are a few plugins that have attempted to offer this and do well, but sometimes crash or give unexpected output. That, and for some users going through the hassle of finding the plugin might be too much.

The disadvantage Inkscape has is it’s handling of lots of nodes. The moment you hit around 10,000 nodes the program begins to noticeably slow down. For most simple logo work this isn’t a problem, but when you come to illustration and highly detailed artwork it gets in the way. This was the main thing stopping me from using the SVG that can be generated from Blender. To test it yourself, import an SVG into Blender and then export it as an SVG using either Pantograph or VRM. You’ll notice that it is now made up of about several hundred smaller shapes.

Before Import to Blender: 11 Objects, 124 nodes
inkscapeblendertext
After Blender import: 2264 objects with 6792 nodes

This makes colouring or modifying the shape really hard. Sometimes, in Inkscape you can just highlight all of the shapes, go to Path > Union (Ctrl + Shift + +) to combine them all but sometimes it makes it all disappear.

Luckily there is a technique to get this to work. If you import an SVG be sure to apply the Ninja Decimate modifier to the shape and drag the Ratio slider down (thanks to heathenx for this tip). Please note that this only work if you shape is a mesh, so hit Alt + C and convert your shape to a mesh.

If you’re working with text you may notice that after you’ve applied the Decimate modifier and dragged the slider down all of your text looks… crap.

screenshot_15_01:24:52

This is because the modifier is treating the text as a whole shape and thus reducing the face count of the whole combine shape rather than treating each character as an individual shape. You need to separate them. To do this, in Edit mode (hit TAB to get there) hit P (don’t do this in normal mode. It runs the Blender game engine and will most likely crash Blender).

Separate menu
Separate menu

From the Separate menu choose All Loose Parts and now each character is an individual shape. Now, if you run the Decimate modifier on each individual character you have a lot more control over its final appearance.

After Modifications: 324 objects, 972 nodes

I exported the text to an SVG using VRM but you can do so using that script, Pantograph or the 3D Polyhedron extension in the Render extension menu in Inkscape. Here’s another render showing exactly why you might want to go through this procedure:

70 objects, 36601 nodes
After basic modification (text from an upcoming project)
After basic modification, 4042 nodes (text from an upcoming project)

The Decimate modifier has its limits. Where a human would simply combine two big triangular faces into a rectangle the modifier sometimes misses this and just over-complicates things and sometimes completely destroys a shape. This is where I ask the Blender community for assistance. Is there a script to easily reduce the face count of an object?

I think native SVG export is something that Blender should work towards in the future. There’s just too many possibilities and opportunities!


Inkscape tutorial: text manipulation

I’ve been messing around with Inkscape a lot recently and have found a few cool tricks. This all originally started as an attempt to recreate an effect I saw on the Inkscape website but quickly evolved into something different.

Here’s an example of the output I achieved.

Something I did earlier

What’s interesting about this is that it’s mostly the work of filters. For this tutorial we’ll be working with text in Inkscape 0.47pre0. To illustrate things better use a font that is very think. Even Arial Black will do. Create two different text objects

The original unmodified text

The manipulations we’re going to apply to this text will be affecting paths, so we need to convert this text to a path. To do this go to either Path > Object to path or press Ctrl + Shift + C. This separates the text into individual paths as a group. Ungroup them (Object > Ungroup or Ctrl + Shift + G) and then combine them as a single path using Ctrl + K. Next, position the text wherever you want it.

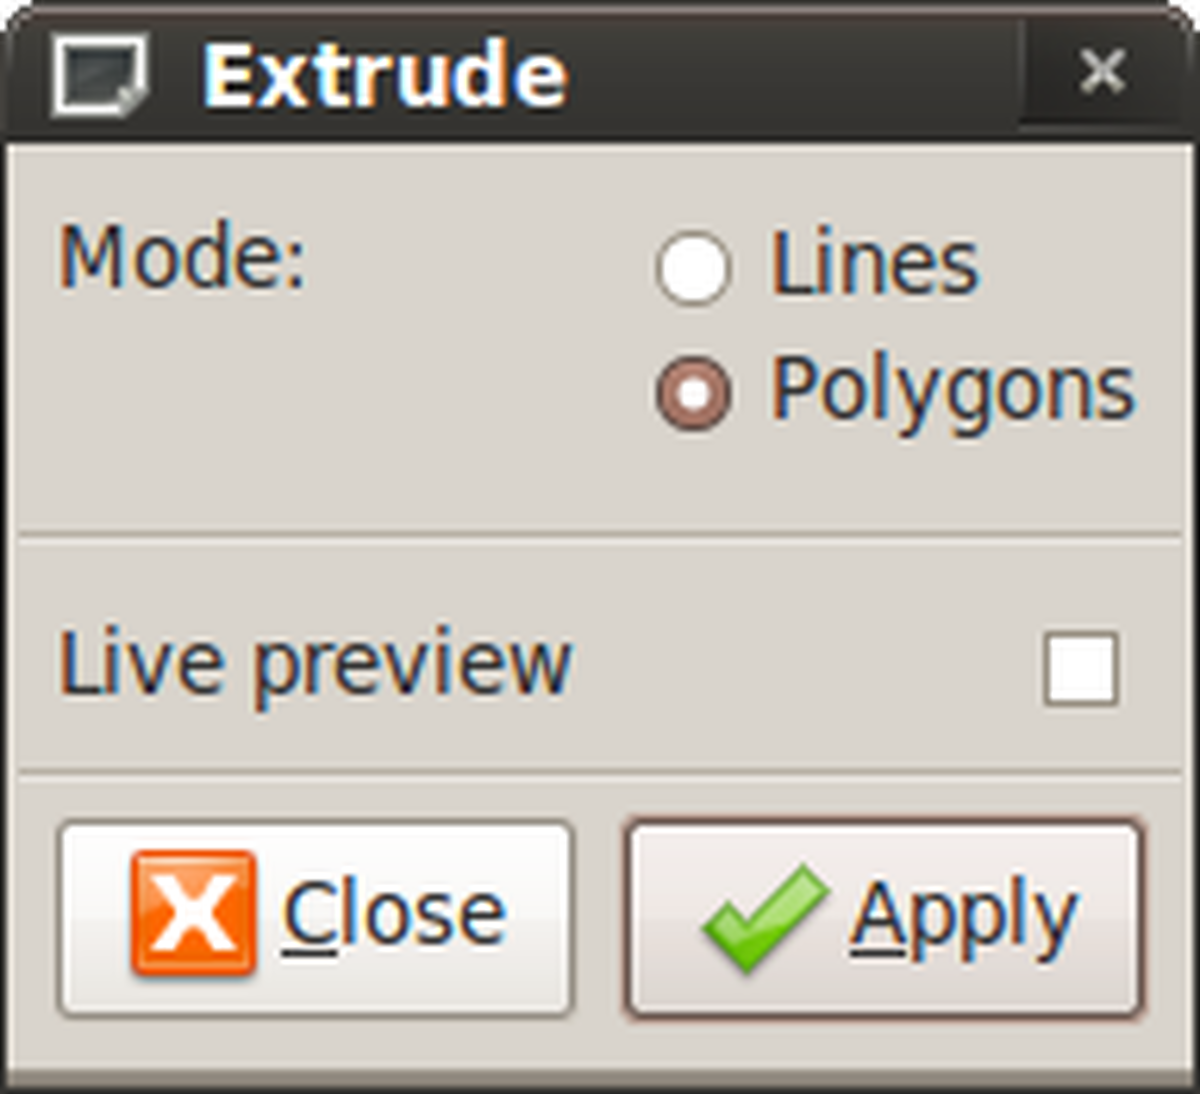
We want to create an extrude between to the two paths. For this you need two separate paths (you created these when you created the text). Click on both of them and then go to Extensions > Generate from path > Extrude.

Extrude window

Clicking on Lines will attempt to link each node of one path to the node of another path with just lines, whereas clicking Polygons will do something similar but link them with shapes. Click on Polygons then press Apply.

Text with extrude effect applied

With the new polygons selected pick a hue for it. The reason I specify hue is because we’re going to be modifying the colour next and the filters we will be using will work with the current hue and modify it. As far as I’m aware it can’t modify shades i.e. black or white.

Colour on the extrude effect

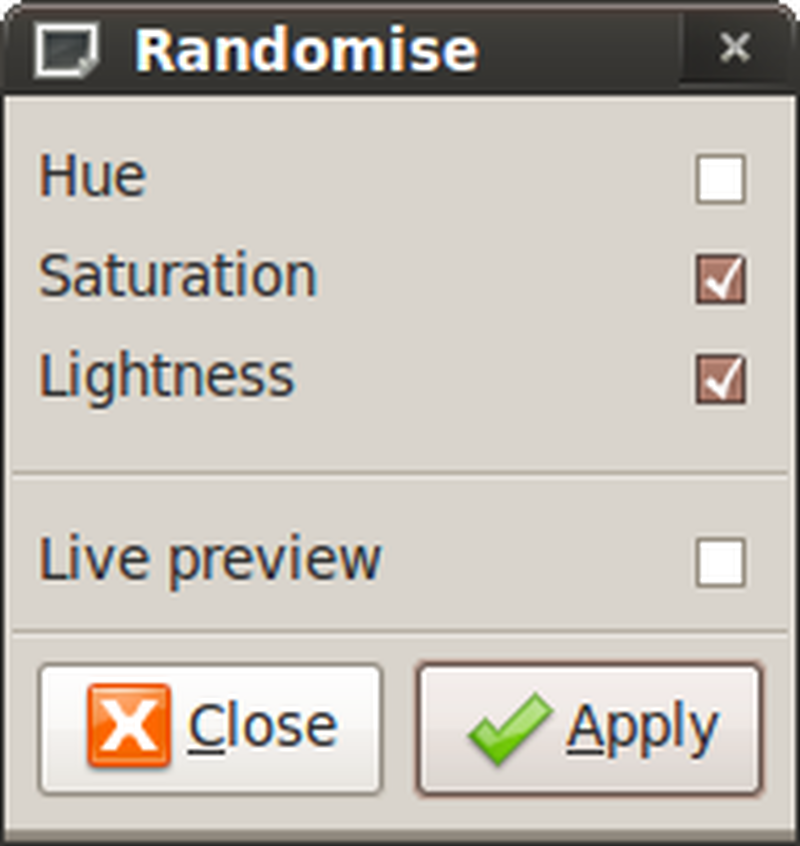
Click on Extensions > Color > Randomise.

Randomise extension window

From this window you have several choices. Randomising the Hue lets you have random colours. Randomising the Saturation will randomise the saturation i.e. if it’s a very vibrant colour or slightly dull. Randomising the Lightness will randomise the brightness i.e. if it is completely bright it will go white, if not it will go black. For this I recommend randomising the Saturation and Lightness. To get a preview of the output check the Live Preview option. If you’re not happy with the combination they’ve given you uncheck then recheck the Live Preview. Press Apply when you’re done.

Finished text

For a finishing touch add a background and change the stroke colour

Completely finished!

Voila!

What else can be done with this effect? Well, you know that you need two different objects for this to work, so why not work with one object but then split it into two. In the example below I split a rounded square into two shapes then repeated this procedure.

Stained glass square

One thing to note is that the more nodes you have the more polygons that will be created

I hope this tutorial has been useful. To extend this try messing around with the Jitter Nodes effect under Generate from Path ;-) For more of my experiments feel free to check out my flickr stream.


In a time before the Wii

Long ago, before the Wii came amount or was ever even mentioned, in 2007 I came up with a very dirty hack that could in theory act just like the Wii controller. I almost used it in an Insectoid performance but that never came about.

The way that it would work is that the user would have a device that would act just like an mouse. When the user left-clicks the computer starts recording the users movements and when they let go of the left mouse button an action takes place dependent on the gesture they made. The overall system uses a combination of OpenSebJ and StrokeIt software (Windows only), together with a mouse-like input device.

StrokeIt is gesture recognition software for Windows that does exactly what it says on the tin. The good thing about it is that gestures are programmable. So, even if I drew an S, I could have it execute any command I wanted to. The program worked in the background, so it would send commands to the active window, which is quite important.

The second program involved in making this work was OpenSebJ. Even as early as 2006 I was involved and inspired by Open Source software, so there’s no guessing why I chose this program. Essentially it is a multitrack audio editor but with one feature that I really needed: A sampler. I couldn’t find a free program anywhere that enabled me to map keyboard keys to a sound. Actually, there was one that was purpose built, though I can’t remember the name of it. Why I didn’t use this program was because I could only play one sound at a time. Hitting any other key would kill the previous sound. Not with OpenSebJ.

So, now that I had a way of tracking gestures and playing sounds according to gestures I needed to introduce the free movement. This is the part where my experiment becomes suddenly expensive!

You would’ve thought that after the invention of the mouse the air mouse would’ve been released straight afterwards. Not so. Presenter buttons only have to listen for a mouse click whereas air mice have to track movement, which is an especially trickier task. The technology behind some of the air mice I found was a gyroscope. I know very little about its construction but what I do know is that it let you track your movement… at a cost. Air mice were/are being sold at about £100.

The way I planned to use this was just to map the users’ gesture on left clicking and then execute an action based on this. Whether the software would accurately be able to detect movement at any angle is debatable, as I never got to try it out, but in principal it works.

The application for this could’ve been wide reaching. Performers could use it as a visual aid in their work, toy makers could use it for new exciting way to interact and even in education it has potential to teach people handwriting by giving them aural or visual feedback.

Then the Wii came out… Now this kind of thing is pretty easy to do:

I think I still will continue to explore this avenue. If I can get a modded Wii I may try this prototype again but with its controllers and then explore where I can take it next. Any thoughts are welcome.


Anything you can do I can also do

Recently at my job at any one time there’d be up to four different operating systems in just one room. There’d be Windows XP, which was on most of the computers, Windows Vista, which I used to dual boot, Ubuntu, my OS of choice and Mac OS X. I’d often have chats with one of my collegues about the differences between each operating system, and they’d always proclaim that Mac’s are superior to everything else. When asked why they’re so much better he could never give me an answer.

He’d show me his shiny interface, dock full of cracked Adobe software and impressively pointless window transitions. Then, I’d load up Compiz and do exactly the same. “That’s just copying Mac”, he’d say. So what? Mac weren’t the inventors of modern interface design y’know. I’d then show him the rotating desktop cube and one of the many other Compiz settings available. He was quite impressed and asked me how he could get those effects for his Mac. Wait, your precious Mac doesn’t have these features? What a shame. I paid only £500 for my laptop and can have more ponies amazingly kewl effects.

A few days later we had some visitors and he kept saying that Mac’s are better because they don’t get viruses. What a load of bull. As the popularity of Mac grows so too will the desire for crackers to write malicious code. Also, are Mac’s in a worse position than Windows when it comes to viruses? Mac users have rarely had to worry about viruses, so maybe its users are more inclined to just click on anything. At least Windows users are constantly being reminded of virus threats. This, of course, doesn’t equate to a more secure system but at least it educates users that the moment you put any personal or precious data onto a computer you are at its mercy and should take caution.

Linux will soon be in a similar position. As it yet isn’t big or attractive enough to crackers we’ve yet to see if the collective efforts of 1000s of coders is more effective than Norton, AVG et al.

This post isn’t a jab at Apple either. In fact, if I could afford to I’d probably buy a Mac laptop and just load Ubuntu on to it, not because it’s a better operating system but because, after using all three for awhile I’ve found Linux systems to do what I need it to and offer me a level of customisation to satisfy my needs. Oh, and it’s free. The Mac laptop is just a well designed piece of hardware and I could see why anyone would want that.

I’ve discussed my disliking for Operating System superiority complex on Twitter before. My argument was that all three major operating systems can do what the other can. After some great feedback regarding this I’d like to change that and say that all operating systems can do what the other can, the difference is just how you do it and how much effort is involved.